The Roll Sciences division uses our proprietary TruShape2™ measuring device to provide superior in-process measurement capabilities.
his helps us deliver rolls to customers with superior precision. This increased measurement capability is important because roller geometry directly affects the way a web is processed through a machine. Therefore it is critical that roller manufacturers and end users know the true shape of their rollers. Ordinary roller manufacturers use conventional measuring devices such as dial indicators, Pi Tapes, and micrometers. However these devices do not have the ability to properly measure a roller’s shape to the level needed for many demanding applications. In these applications, roller geometry variation must be tightly controlled to produce the most robust process possible in the customer’s machine. The only way to know a roller’s true geometric variation is to measure for factors including concentricity and cylindricity at a very high level of resolution.
This advanced electronic measuring system produces accurate pictures of the exact geometric shape of a roller. These pictures can help diagnose roller problems and help ensure that new rollers will be successful in customers’ equipment. This means that converters and manufacturers can use the resulting higher precision rolls to gain increased control of their production processes. The TruShape2™ is a next generation metrology device built using technology with higher repeatability than even laser-based systems. Our new device delivers repeatability of +/- 0.2 microns (7.9 × 10⁻⁶ inches) compared with ordinary laser micrometer systems having repeatability of about 13 microns (about 5 ten-thousandths of an inch).”
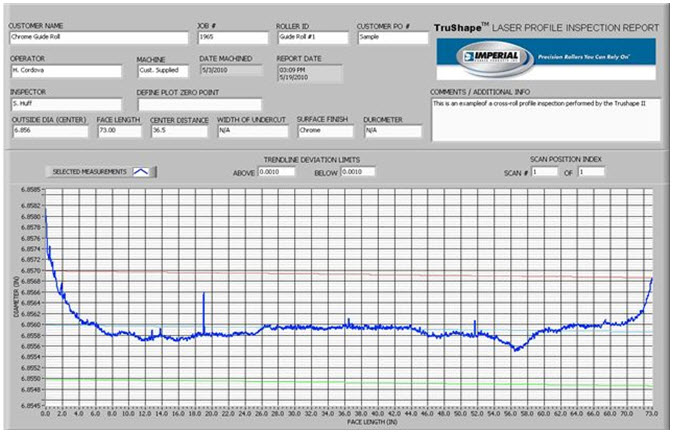
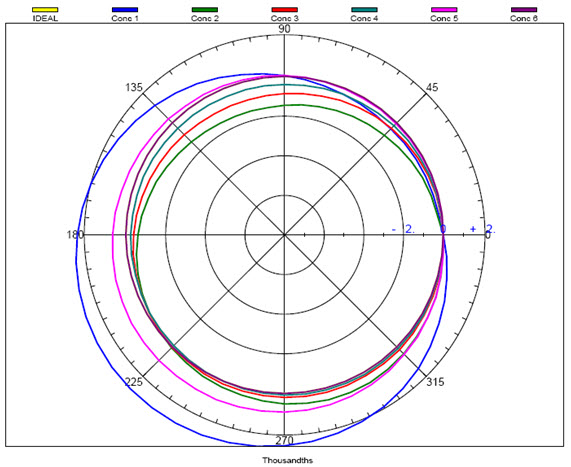
With such a large number of data points gathered by the new measuring device, Roll Sciences can produce and deliver to customers highly detailed graphic illustrations that allow the roller owner to clearly see, for example, how cylindrical their roller truly is, as shown in the following examples:
Cross-Roll Profile Performed by the TruShape2™ (Sample)

Concentricity Plot Performed by the TruShape2™ (Sample)


